Replacing Front Suspension's Lower Control-Arm Bushing - Strong Arm Tactics
Taken from Mopar Muscle Magazine.Lower Control Arms Never Had It So Good
From the June, 2003 issue of Mopar Muscle
By Steve Dulcich
Photography by Steve Dulcich
Intro
In a Mopar front suspension, the lower control arms are like heavy equipment on a job site. They transfer all the torsion bar's force and actually hold the car up, while the strut rods handle the fore and aft forces. The upper control arms locate the uprights and swing along for the ride. When Mopars are equipped with a sway bar-you guessed it-they tie into the lower control arms. If performance handling is the goal, the lower control arms had better be in top condition.
What can go wrong with such a simple looking chunk of metal? There's no question the first thing to blow out of a Mopar front suspension is also the toughest part to replace: the lower control-arm bushing. When the bushings go, accurate control and handling go with it. The lower control-arm bushing is the only replaceable "wear" part on the arm, but it is also the most critical bushing in the suspension. We've got some tricks to make the nasty job of replacing it easier.
We're in the process of building a hot-handling E-Body, which will see a host of suspension and braking upgrades up front. When we heard our pals at AR Engineering had fabbed-up reinforcements to beef up the lower control arms, it made perfect sense to investigate it further. The AR piece boxes the open lower section of the arms, and the prospect of added strength to these highly-stressed units got our attention. After all, looking at the stock control arms, it is clear by the beefy vertical section that they are built to take an enormous amount of loading in a vertical plane-no surprise, since the major loading is vertical, supporting the vehicle's weight. Now think about a fat sway bar linked in front of the arms' centerline. What we now have, in engineering terms, is a torsional moment; the sway bar forces want to twist and distort the control arm. Our plans included a fat aftermarket front sway bar, and any extra muscle we could add to the arms would be welcome.
Let do it
Mouseover the images for original size.

Rebuilding your front suspension? Here's usually the most difficult part to get right-the lower control arm. The lower control arm pivots on the pivot shaft (left). The pivot shaft bolts solidly to the K-member and doesn't budge, while the torsion-bar socket rotates with the control arm. Torsional deflection in the lower control arm's inner rubber bushing is the only thing that lets it rotate for suspension travel. Replacing the lower control-arm bushing is the number-one source of misery in rebuilding a Mopar frontend, unless you know the tricks.

The pivot shaft comes out first, and removing it is simply a matter of pressing it out from the back through the torsion-bar socket.

The shaft will come out with the inner bushing shell still attached. It's a tight press fit. With a hammer and chisel, make four grooves along its length 90 degrees apart. Marking it this way will relieve the press fit, and the shell will usually slide off by hand.

Three parts make up the lower control-arm bushing: an inner shell, an outer shell, and rubber in between. The inner shell will come out with the pivot shaft, leaving the rubber and outer shell. We've heard all kinds of crazy ideas about how to get the remaining pieces out of the lower control arm, including burning out the rubber. Actually, the rubber isn't vulcanized or bonded to the shells at all, and will pry out with a screwdriver.

The part that can be brutal is removing the outer shell, which remains in the control arm. Just press it out? Sorry, there's nothing to press against. The service-manual procedure is to split it along one side with a chisel, collapse it, and muscle it out. Take it from us, it's not easy to do and will almost always result in scars, both in the bushing bores and on your hands. What's the washer for? Glad you asked.

A trick we use is to weld a heavy 1/8-inch or thicker 1/2-inch washer to the end of the shell. This gives us something to press against. The welds have to be solid with good penetration for this to work, but it takes only seconds per arm to zap the washers in. Of course, be careful not to weld the shell to the control arm.

Press from the opposite side of the lower control arm where the nut is welded, and use a long half bolt with a nut a few threads down from the end. The extra couple of threads center through the washer, and the nut gives a good surface area toward the edge of the washer for pressure. Use a piece of pipe on the backside of the control arm to give the bushing somewhere to go as it is being pressed out.

Forty-five minutes of hard hammer and chisel work are reduced to five minutes of easy welding and pressing. The bushing shell slides right out. If you are lacking a press, the shell could probably be driven out with a big hammer.
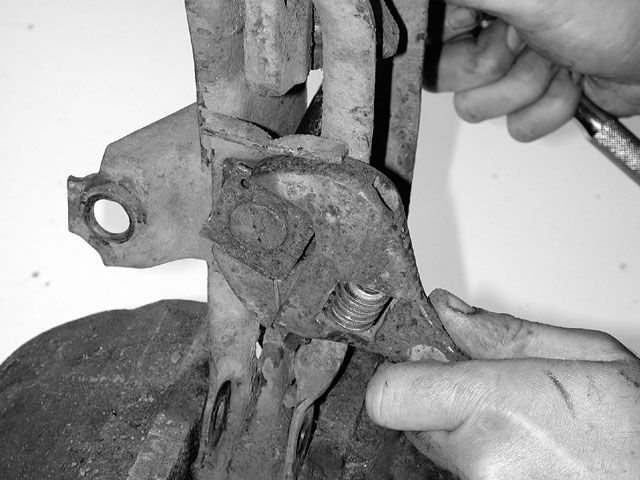
The rubber bumpstop is usually destroyed (do you see any rubber here?) and frozen on. Though the bumpstop's mounting stud keys into the arm to prevent it from spinning, trying to wrench off a rusty one like ours will often egg-out the mounting hole in the control arm. Use a wrench to keep it from spinning, although it's not necessary to find a wrench as rusty as ours. Sometimes if they're really frozen, it's best to grind through the stud's head with an angle grinder.

A nice sandblasting will do wonders for a dirty and scaly piece of steel. We blasted ours to white metal with extra-fine silica sand.

Here's the new trick product we were talking about. These laser-cut steel reinforcement plates from AR Engineering are made to box the control arm for added strength. The boxed arms have less deflection, especially if heavy-duty sway bars are used. If the control-arm members have spread, allowing for a loose torsion-bar anchor, this is a good time to remove some of the clearance as the structure is reinforced. Notice that the weld area has been buffed to shiny metal. It's practically impossible to get a good weld on an as-blasted surface.
![]()
The 1/8-inch plates easily conform to the curvature of the control arm with clamping. Now is also a good time to see if the torsion-bar- adjuster pivot at the end of the arm (arrows) has too much side-to-side clearance. Pulling in the sides of the control arm for a flush fit while clamping the plate can reduce the clearance. The anchor does not move relative to the control arm once the ride height is set, so little to no clearance is required. The fit of our plates is right on the money.

After tacking on the brace, run a full weld along each side. Boxing the control arms takes only minutes.

All that's left is installing the new bushings. First, the pivot shaft must be pressed into the bushings.

The pivot shaft/bushing assembly is then pressed into the control arm. We use a piece of pipe to apply pressure on the flange of the outer bushing shell. We favor stock rubber pieces in the lower control arms because the poly bushings have no means of positively retaining the control arm to the pivot shaft.

With our lower control arm boxed, bushed, and painted with a mix of bare steel urethane paint, the control arms are better and nicer than new.