Make my car propane only
After driving my car, for a couple of years, with a dual fuel setup, it's time to get rid off the petrol stuff.
And make the car single fuel again. Propane (LPG) in this case. I didn't use petrol anyway, so what's the use of a carburetor, apart from the throttle body?
This also solves some typical carburetor restrictions, i.e. the venturi & choke control.
Only the throttle plates from a new 4-bbl throttle body will remain between the propane mixer and the intake.
That alone gives you more power.
Everything goes on top of an aluminium Edelbrock Performer intake.

Extra long carb studs. On propane you can use a single plane intake for street use. Because this is a dual plane intake,
I use an 1/2" high open plenum carb spacer to connect the two sides. You can probably mill the divider away, but I try this, it's easier.
The spacer is from phenolic plastic, so it also serves as a thermo barrier between the manifold and propane mixer.

This is another reason for longer studs, a lot of gaskets and adapters.
Gasket → spread- to squarebore plate → gasket → 1/2" spacer → gasket → throttle body.
And on the driver side of the carb, a throttle return spring bracket.

It is not possible to mount an Impco 300A mixer directly onto a throttle body, as you can do with an Impco 425 mixer.
You need some sort of an adapter between the mixer and baseplate.
In this case the Impco A3-96 adapter.
I bought this adapter from NashFuel via Ebay. An excellent seller, very fast & good prices.
(I have no affiliation with this seller, other than I bought this adapter from him).

The bottom side of the throttle body. The adapter is already screwed on.

The A3-96 adapter on top of the throttle body. With a tiny bit of RTV silicone rubber, as a gasket, between the two.


Looking into the adapter, seeing the throttle plates. The adapter is very nicely cast. No throttle plate is touching the adaptor.

The adapter and baseplate on top of the Edelbrock intake. Unfortunately I found out that the old 2-barrel kickdown linkage will not fit an 4-bbl carb throttle plate
(an 4bbl is wider than an 2-bbl).
But luckily Bouchillon Performance is making an excellent
TorqueFlite kickdown cable kit. Together with their accelerator cable mounting bracket, this should work great.

I installed the Bouchillon parts which go on the transmission. The old kickdown lever gave me some headache, I couldn't remove it.
But it finally did came off. Here you see the new kickdown lever, the return spring and the new return spring bracket.
The cable bracket isn't visable in this picture, it's more to the right.

Here you see the Bouchillon parts which go onto the throttle lever. And the Bouchillon accelerator/kickdown cable bracket.
I found out that the accelerator cable is a little too short and after 40+ years it's too rigid to bent in a new direction. So I have bought a new one.

I've got a new accelerator cable. As you can see it's not a "little" longer, but quite a bit longer. Old on top, new at the bottom.
With this length you can easily use a high-rise intake and maybe even use an 2 inch spacer.

The shop manual doesn't mention how to replace an accelerator cable. But as it seems, you have to unbolt the metal plate, onto which the accelerator pedal goes.
At the top is a hole in which the cable is hold down with some sort of a C-clip.

I modified the throttle return spring bracket. With the new kickdown cable, the return spring bracket was interfering with the kickdown bracket.
So I had to saw it in half. This is the result. The only thing is, the springs (see green arrow) are to heavy.
So I removed one. The second spring is on the accelerator lever shaft of the throttle body.

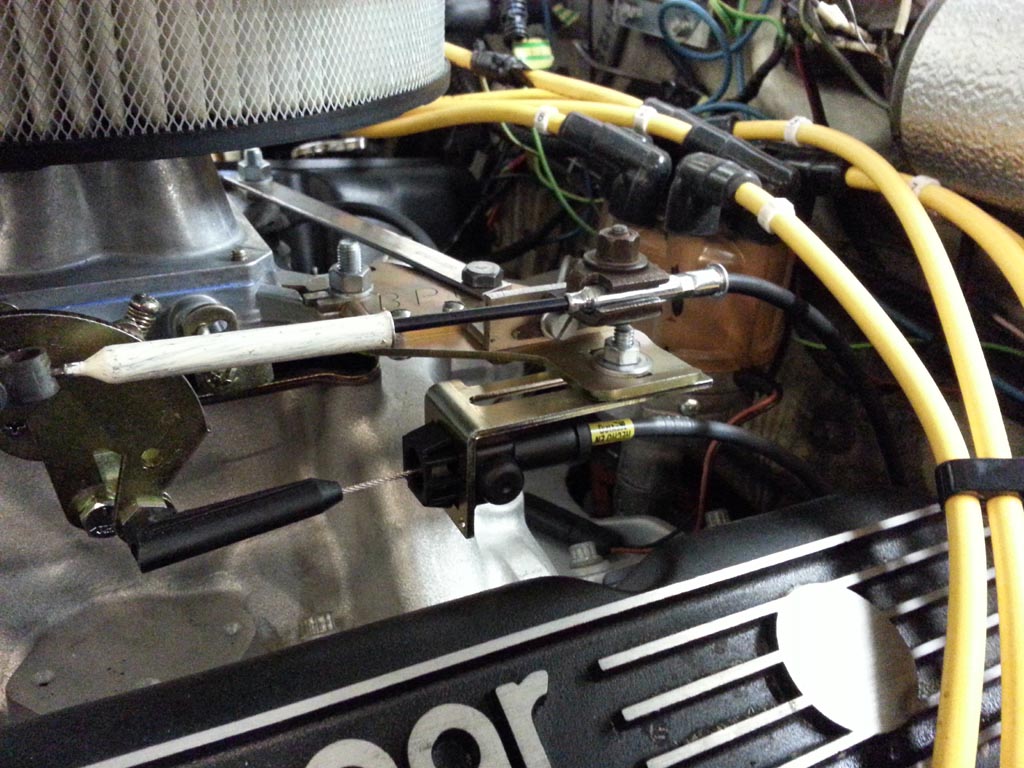
Another modification. The BPE accelerator-cable-mounting-bracket (blue arrow) is only mounted at one carb stud. That is, in my opinion, not enough.
So I made an extra bracket between a carb stud and the BPE bracket. This way you get a triangle, which is very strong.
(red arrow is extra bracket)

So everything is working (see video on bottom of heads & intake page).
Here are some pictures of the Impco 300A mixer. Bolted onto the Impco A3-96 adapter.


A new air cleaner and the low pressure hose from the vaporizer on top of the 300A mixer.


This project was finished, on april 23, 2013.
Unfortunately I could not adjust the accelerator- & kickdowncable very well.
So I had to modify the accelerator- & kickdowncable bracket.
I could not adjust the accelerator- & kickdowncable separately, because both cables are hold down with the same bolt.
Which means when I've adjusted one of the cables, the other one has moved and you can start all over again.
So now both cables have their own holddown bolt & bracket and I can adjust one of them without the risk the other cable has moved.
The cable on top is the acceleratorcable. The bottom one is the kickdowncable.
Mouseover for larger image.
Mouseover for larger image.
