New gauges for the Coronet
Because the gauges in the instrument panel didn't work anyway, only the speedo did, I decided to remove all gauges and install some Autometer gauges instead. I had already a couple of Autometer gauges mounted under the dash, so I bought a new speedometer and some other gauges to complement the three I already had. The idea is to remove the gauges from under the dash and place them, with the newly bought gauges, into the instrument panel. So some remodelling is necessary to accommodate the new gauges.
This is the original instrument panel. Not mine, but it's the same. Because the new gauges are round, they don't fit into the rectangular holes.
That means the whole panel have to be cut out.

This is the back of the instrument panel. I already removed some pieces.

Sawed out the instrument panel.

Front of the instrument panel.

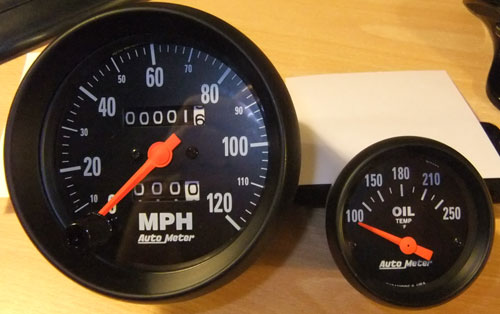
This are the new gauges (at least, two of them). The speedometer is the biggest with 3-3/8" diameter (85.7mm). All the others are 2-1/16" (52.4mm).
The gauges are Autometer Z-series, short sweep electric, accept for the speedo, which is mechanical.
The gauges are: oil pressure, oil temp, water temp, voltage & fuel.
A sixth gauge will be an Innovate wideband air/fuel ratio gauge, which will be added later.
 The four lights (highbeam, oil-pressure & two indicators) have to be replaced as well.
I found these green arrow, led powered, lights, which will be used for the indicator lights.
The highbeam & oil pressure lights will be 10mm led lights in special housings. Blue for highbeam and red for loss of oil pressure.
The four lights (highbeam, oil-pressure & two indicators) have to be replaced as well.
I found these green arrow, led powered, lights, which will be used for the indicator lights.
The highbeam & oil pressure lights will be 10mm led lights in special housings. Blue for highbeam and red for loss of oil pressure.
This is the plate which will hold the gauges. This is a printed circuit board. Unused of course. This is made of fiberglass and epoxy resin.
Only one side has copper on it and that will be the inside. So I can solder some things on it to hold the board down into the frame.
Here you see the copper side, covered with a black protective layer.

Top side, this is where normally the components (resistors, capacitors etc.) are located. This will be the front.

This is a photo sensitive board, which means that below the black cover is a photo sensitive layer. To get rid of this layer I will use some drain cleaner mixed with water.
This is a poor mans trick, if you didn't had the money to buy developing solution, you could use drain cleaner.
(wearing protective gloves and glasses is always a must, with drain cleaner!)

The photo sensitive layer is gone, this board was old, so some sticky goo from the protective cover still remains. But you can clearly see the copper layer.

All holes are made in the panel. Now I have to think up something to hold the panel down into the frame.

The back of the original instrument panel is an aluminium housing. I sawed the back off of this housing,
so I only have the outer edge of the instrument cluster housing. This way I have a means to secure the new panel in it's place.

Work is almost done. The provisions to hold the panel down are made. You can see the backside of the speedo. I just did a last check if everything fits and it did.
So now it's time to paint the front of the new instrument panel.

So, the panel is painted. Black, semi-gloss.

Installed all gauges, except for the AFR gauge. The AFR is from an other brand (Innovate) and the bezel is gloss black, so I have to repaint this into semi-gloss

The back side, pre wiring.

I did some wiring, checking the backlights. They work, except for the air/fuel gauge. That's a digital meter, so it has no backlight.
I moved the air/fuel gauge to the right.

Everything is wired and ready to go, into the car.

Some detail shots:
One of the turnsignal indicator lights. The tiny resistor (that blue thing with the colored stripes) is to reduce the current through the LED.
The big beige/grey thing is the resistor to keep the blinking of the turnsignal lights in a reasonable on/off frequency.
The resistance of a LED is so high, that it looks like there is no lightbulb at all for the turnsignal mechanism.
So you have to "fool" the system that there is still a normal lightbulb.

The schematics, for all LED lights of the dashboard.

This is the shared ground point. This was easier than daisy chain the ground wire to all gauges.

Everything is connected via connectors, for easy removal. One connector for all power wires, one for all sensor wires & one for all dashboard lights.

I finally found a good place for the fusebox, behind the glove compartment. I had to make a special bracket though.
This place is easily reachable, if a fuse is blown. (Fuses are not yet inserted)

I could not install the instrument panel with the speedo installed. And I could not use the bracket from Autometer, because I couldn't reach the instrument panel from behind or below the dash.
So I had to come up with something else.
This is it. I glued a small aluminium panel behind the speedo. This way you can secure the gauge from the front, with small bolts.

This will only work if the nuts for these bolts are fixed at the other side of the panel.
So I came up with this: I used brass nuts, which I soldered on a brass strip. This strip will be glued to the backside of the panel.
These brass strips give a larger area to glue. So the nuts don't get loose while tightening the bolts.

This is one of them, glued to the back of the instrument panel.
I glued these strips because I was afraid the paint, on the front of the panel, come off when I solder them on.

This is the front. I used M4 Allen bolts to secure the speedo.

I rewired everything. All wires are now in a wiring harness (see the black tube, with green TY-raps, on the bottom of the picture).
The connectors are in a better position than before. Two on the left, one on the right.
This way there are no wires or connectors behind the speedo or behind any of the gauges for that matter.

The instrument panel is back into the dashboard.
The backlights and gauges are working after some startup problems, nothing what couldn't be fixed though.
The warning lights and the turn signal lights are working fine.
Especially the warning lights, oil pressure and high beam, they are very bright. I can't miss them, when they turn on ;-).
That's great when the oil pressure drops rapidly!

So that's all! The new instrument panel is finished.
The only thing what's left, is installing the steering wheel.
This project was finished on March 3 2013.